 |
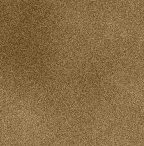
Start by setting your
colours to a light and dark brown like this  then apply difference
clouds and add monochromatic noise at around 6 then apply difference
clouds and add monochromatic noise at around 6 |
 |
Apply the
filter/artistic/drybrush and mess around with the settings, i used 10, 10,
2 |
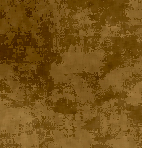 |
Knock the brightness down
to 20 and the contrast up to 30 |
 |
Apply the
filter/distort/shear so it looks similar to this. Duplicate this layer to
use as an overlay in the next step |
 |
On your new layer motion
blur it by 999pixels, angle 0. Duplicate this layer to use as the knots
later, you should now have 3 layers |
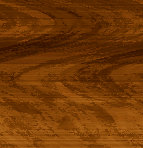 |
On the middle layer set the blending
option to overlay, thats the basic wood texture done |
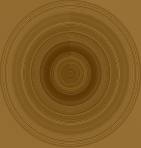 |
Now, on the top layer, apply the
filter/distort/polar coordinates to make the knot |
 |
Select a circle of this and shrink it down
using edit/transform/scale |
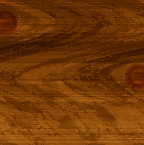 |
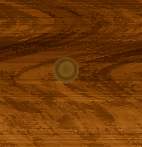
Place the knot (or knots, just
duplicate them if you want more) then set the blending options to
overlay |
 |
Now just do a couple of 1 or 2 pixel
lines to make the panels, add a darker line to the top to make it look as
though it's carved out. Done.
|