Creating 3D Pipes
Program(s): Photoshop
Level: Intermediate
Tools Used: ![]()
![]()
Alright, this is a very simple tutorial aimed at a medium-beginner user of Photoshop. Pipes, although sometimes [very] overused, add a good amount of depth and detail to a technical or mechanical style illustration. If you're going to take the techno-mechanic path, may as well use pipes... right?
- First off make sure your paintbrush options are set up like mine:
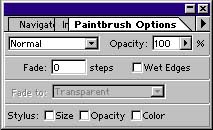
(Mode: Normal, Opacity: 100%, Fade: 0 Steps, Wet Edges: Off, Stylus: All Off)
- Next set your paintbrush's brush settings to the following (double-click on any brush):
(Diameter: 12 pixels, Hardness: 60%, Spacing: 1%, Angle: 0, Roundness: 100%)
- Set your foreground color to Black (0,0,0).
- Set up your Quick Mask options by double-clicking the Quick Mask mode
button

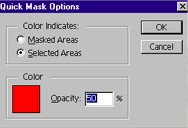
(Color Indicates: Selected Areas, Color: Red, Opacity: 50%)
Now that this is all set up, we can begin working on the pipe thingy.
Step 1
- Create a new image with a black background.
One good way of creating smooth pipes is by using the pen path tool (P).
![]() (Left) All of the path tools.
(Left) All of the path tools.
One version of the pen path tool, called the freeform pen tool ![]() allows you to draw any shape freehanded, and converts that shape to a
smooth bezier curve path. We are going to create a path with this tool
and stroke the path in Quick Mask
allows you to draw any shape freehanded, and converts that shape to a
smooth bezier curve path. We are going to create a path with this tool
and stroke the path in Quick Mask ![]() mode to create a mask from the stroke.
mode to create a mask from the stroke.
- Switch to Quick Mask mode (Q)
By using the freeform pen, create a simple path, something like this if you want:
After you finish this, open the Paths palette:
![]()
Right-click on Work Path and choose Stroke Subpath. When asked what tool to use, choose Paintbrush.
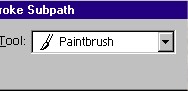
Press OK and an image like this should be created:
Deselect the path by clicking on a blank area in the Paths
window, and switch to Normal mode ![]() (out of Quick Mask mode
(out of Quick Mask mode ![]() ). You should see a selection created. Press CTRL+J to do a Layer via
Copy from the background layer. This will create a new layer in the shape
of your seletion.
). You should see a selection created. Press CTRL+J to do a Layer via
Copy from the background layer. This will create a new layer in the shape
of your seletion.
Select this layer and turn on Preserve Transparency. Set
the foreground color to gray ![]() (100,100,100)
(100,100,100)
and fill the layer with the foreground color. Next, create a selection
from this layer by holding down CTRL and clicking on the layer in the
Layers palette. Go to the top menu and choose Select > Modify >
Contract. Contract the selection by 4 pixels and choose OK. Now move this
selection up 2 pixels and to the left 2 pixels by selecting the Marquee
Tool ![]() (M) and using the arrow keys to move the selection one pixel
at a time. Now go to the menu and choose Select > Feather, and enter
3 for the feather radius. Choose OK. Your selectionwill look like it has
contracted a bit, but it hasn't. Select Layer1 (the original pipe layer)
and press CTRL+J to do a Layer via Copy. This will create Layer2.
(M) and using the arrow keys to move the selection one pixel
at a time. Now go to the menu and choose Select > Feather, and enter
3 for the feather radius. Choose OK. Your selectionwill look like it has
contracted a bit, but it hasn't. Select Layer1 (the original pipe layer)
and press CTRL+J to do a Layer via Copy. This will create Layer2.

Enable Preserve Transparency for Layer2, and make your foreground color White (255,255,255). Fill Layer2 with the foreground color. Change Layer2's mode to Color Dodge and set it's opacity to 75%.
Boom, easy as that. Now it resembles a 3D-ish pipe. But the realism is still pretty low. This pipe is only being lit by one light source, let's add a backlight.
Here's where I talk alot without showing you a bunch of pictures. You should already be familiar with everything I'm talking about in the next paragraph by now.
First, CTRL+Click on Layer1 to create a selection from the
ase pipe layer. Then choose Select > Feather, and set the feather radius
to 2 pixels. Move the selection with the Marquee Tool ![]() up two pixels and to the left two pixels. Now choose Select > Inverse.
This will invert the selection, now the outside of the pipe is selected,
with slightly feathered edges blurring over the side of the pipe. Choose
Layer1 and hit CTRL+J to create a new layer from the selection via copy.
Fill this layer with white, change it's mode to Color Dodge, and change
it's opacity to 50%.
up two pixels and to the left two pixels. Now choose Select > Inverse.
This will invert the selection, now the outside of the pipe is selected,
with slightly feathered edges blurring over the side of the pipe. Choose
Layer1 and hit CTRL+J to create a new layer from the selection via copy.
Fill this layer with white, change it's mode to Color Dodge, and change
it's opacity to 50%.
There, that's all. Now you're done, and ready to fill Layer1 in with any color or pattern you want. You may also want to add a drop shadow to Layer1.